As the last project in my graphics class we were instructed to choose any white-paper, then research and implement it. I decided to implement depth of field (DoF). It’s an effect that simulates how lenses (cameras, our eyes, etc) focus light.


I had to give a presentation which you can find here. In reality, we have to fake depth of field, but I’ll cover the real-life physics as a side discussion.
How it Works: The Graphics
Depth of field is really cool, but turns out to be really expensive, computationally. There are several techniques for calculating true DoF, however they’re too slow to use in games (I outline a few of them in the presentation). Due to this, my implementation is not true DoF, but rather a much-cheaper approximation.
The first step is to calculate the CoC per-pixel. We do this based on the view-space depth of each pixel, and run this through some math to calculate the CoC. While doing this, we need to classify whether a pixel is. Where a pixel lies will change how we calculate its CoC.

This is showing the CoC value of each pixel. Black is a CoC of 0, white is max CoC. In this scene, we’re focusing on the back-row, which is why that section is dark.
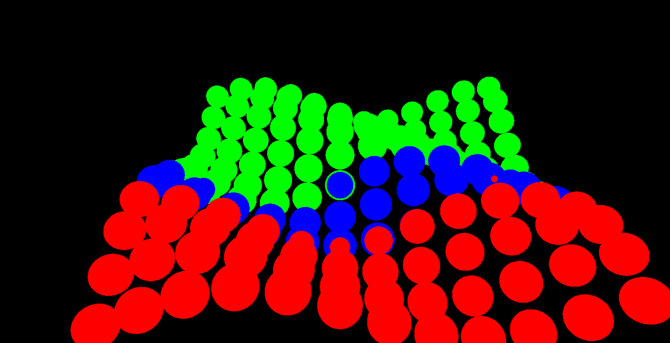
Not a part of the pipeline (and also a picture from a different scene than the first picture), but this shows where different pixels have been classified. Green is the background, blue is the focal-plane, and red is the foreground.
We then do some processing to generate low-resolution versions of the CoC texture and the final-scene texture.

The low-resolution CoC.
Finally, we calculate the result of each pixel by combining the high-resolution and low-resolution images, along with a blur. This is finally rendered as the final image! Pixels at the focal distance will have a CoC of 0, while far/near objects will have a maximum CoC at a given distance. I’ll pass over some of the more technical details (again, available in the presentation), but it was fairly easy to implement, and the results look pretty good.
One thing I want to improve is the blur; I only do a 4-tap 3×3 blur, and at extreme blur radii you get a bad ghosting effect like this:

Over the far-left corner you can see some ghosting artifacts, as well as some sharp rings on the far-right corner of the array. When I have some time, I’d like to utilize the compute-blur that I implemented for exponential soft shadow-maps. I’m not sure exactly how good the result will actually look, the paper I followed was from 2006 so compute-shaders weren’t an option back then.
How it Works (In Reality): The Physics
Given a convex lens (lens is thinnest at the edges, grows towards the middle), incoming light gets focused to a single point. The location of this “focus point” is based upon the physical properties of the lens.

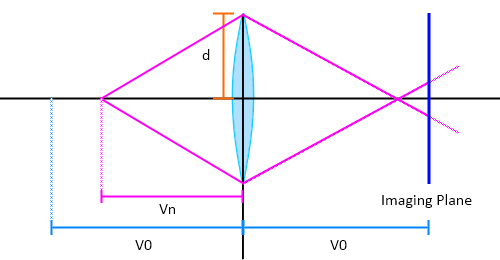
In this first picture, we have a lens with radius d, a focal distance of V0, and some imaging plane. The focal distance is the distance in which objects are perfectly in focus, and the imaging plane is the plane in which the image is projected and captured (light-sensor of a camera, back of our eye, etc). Focal distance is depending on the physical properties of the lens, and the imaging plane is (usually) at this focal distance. Due to the nature of the lens, there are 3 cases we have to handle:
Case 1: Object is in focus

In this image, we have our lens and a single point (emitting light) that is V0 distance away from the lens. Because the point is lying directly at the focal distance of the lens, it will be focused onto an infinitely small point on the imaging plane.
Case 2: Object is beyond focal distance

In this second example, our object is located at Vf distance away from the lens. This is farther than the V0 distance, therefore the image will converge behind the imaging plane. This is described as being in the background.
Case 3: Object is before focal distance
In this final case, the object is located at Vn distance from the lens. This is closer than the V0 distance, therefore the image will converge in front of the imaging plane. This is described as being in the foreground.
The final thing to point out is something called the circle of confusion (CoC). Notice how the foreground and background objects didn’t converge onto the imagine plane? When an object is out of focus, the light that is bouncing off of it isn’t focused onto a point, but rather a circle (sort of! I’ll explain this later). I label it as c in the following diagram:
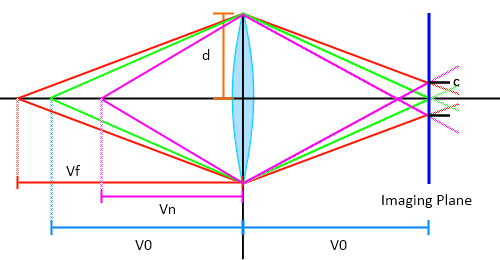
On the right, I’ve labeled the radius of the circle of confusion as c.
An interesting note is that the CoC of objects that are beyond the focal distance converges to a constant value, while the CoC of near objects is unbounded. In English, far objects could never have a CoC larger than the lens (since we’re puling away), while close objects can be spread infinitely wide (technically the object bounces off the lens at some point, but I’m not worrying about that). There’s a decent amount of math that helps calculate all of the variables that I outlined above, which you can find in the presentation.
Studying DoF actually helped me understand a lot about cameras and our eyes! People with glasses (such as myself) cannot focus correctly, therefore everything has a CoC, making my world blurry. If you want a huge area in focus, you’ll use a tiny aperture (pinhole cameras), which keeps everything in perfect focus since the radius of the CoC is dependent on lens-size. Photographers are very familiar with DoF, and they use something called f-numbers (or f-stops, it goes by a lot of names) to take cool pictures such as tilt-shift photography.
As another quick tangent, the CoC is where we get something called Bokeh. This is the name of a phenomenon that happens with camera lenses. Most cameras have a lens that looks something like the following:

If properly focused on the target, pictures will not have bokeh. However, when an object is out of focus, the light can get shaped by this aperture. This can be used to create some cool effects, like this:

This isn’t a photoshop! If you place a heart-shaped paper-cutout in front of a camera lens, you can reproduce this effect. This makes sense; light that converges before/after the imagine plane clips onto the paper-cutout, causing out-of-focus light sources to appear as hearts.
I’m incredibly excited to be on my last semester, I’ll be tackling ray-tracing for my last CS class, so keep an eye out for posts about it!
